
Macs Fan Control
Monitor temperatures and take control of your Mac’s fans. Set custom RPM values, create sensor-based fan curves, and keep your hardware running cool.
What is Macs Fan Control?
A free temperature monitoring and fan management utility for every Mac owner
Temperature monitoring meets fan control
Macs Fan Control is a free utility developed by CrystalIDEA that gives you real-time visibility into your Mac’s thermal sensors and full control over its fans. The app reads temperatures from the CPU, GPU, SSD, memory controller, and battery, then lets you override Apple’s default fan curves with your own RPM values or sensor-based profiles.
Version 1.5.20 (released December 2025) runs natively on both Intel and Apple Silicon Macs, including the M1 through M5 chips. If you run Windows through Boot Camp on an Intel Mac, there is a separate Windows build as well. The macOS version is free for core features; a Pro upgrade unlocks presets and advanced automation.
Who actually uses it?
The app has picked up a loyal following among three groups. Power users who push their MacBook Pro through heavy video editing or compiling want to keep temperatures in check without waiting for Apple’s conservative fan curves to kick in. iMac owners who have swapped their original HDD for an SSD often lose the factory fan sensor, and Macs Fan Control fills that gap by letting them tie fan speed to a different temperature reading. And anyone who simply finds their Mac too loud can dial back the RPM to a quieter level when thermals allow it.
With over 3,600 reviews on MacUpdate and regular mentions across Reddit and XDA Developers, it has become one of the most widely recommended Mac utilities in the hardware community. Linus Tech Tips has featured the app, and CrystalIDEA keeps a steady release cadence to support the latest macOS versions and hardware.
How it works
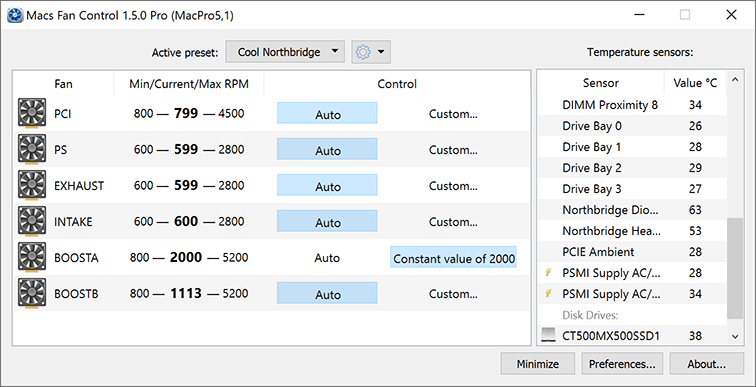
The interface is a single window split into two panels. The left side lists every fan in your system with its current RPM, minimum, and maximum values. The right side shows temperature readings from all available sensors. You pick a fan, choose between a fixed RPM value or a sensor-based automatic curve, and Macs Fan Control handles the rest. When you quit the app, fans revert to Apple’s default behavior, so there is no risk of permanent changes.
Ready to take control of your Mac’s thermals? Download Macs Fan Control or jump to the getting started guide.
Key Features
Macs Fan Control gives you full visibility into your Mac’s thermal state and lets you decide exactly how your fans should respond.
Real-Time Fan Monitoring
See minimum, current, and maximum RPM for every fan in your Mac. The dashboard updates continuously so you always know what your cooling system is doing.
Temperature Sensor Readouts
Track temperatures across CPU cores, GPU, motherboard, storage drives, and memory. All sensors report in real time from a single, clean dashboard.
Manual RPM Control
Set a constant fan speed by choosing an exact RPM value. Useful when you want your Mac quieter during meetings or cooler during video exports.
Sensor-Based Fan Curves
Link any fan to any temperature sensor and define how aggressively it should ramp up. The app adjusts RPM automatically as the chosen sensor reading changes.
S.M.A.R.T. Drive Monitoring
After replacing an iMac HDD with a third-party SSD, the system fan often runs at full speed. Macs Fan Control reads S.M.A.R.T. data from the new drive and lets you tie fan speed to its actual temperature.
Menu Bar Integration
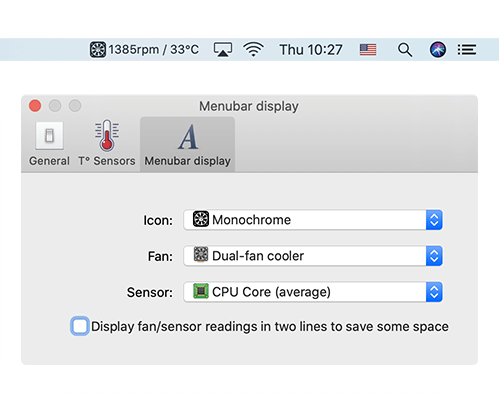
On macOS, current fan speeds and temperatures appear right in the menu bar. You can customize which sensors show up so the info you care about is always one glance away.
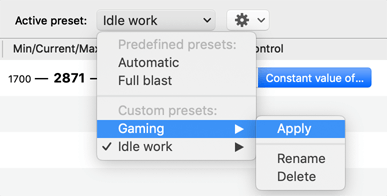
Fan Presets
Save named profiles like “Quiet” for low-noise work or “Performance” for heavy rendering. Switch between them in two clicks. Presets are a Pro feature.
Auto-Revert on Quit
Close the app and your fans go back to the default system behavior. No permanent changes, no risk of forgetting a manual override running overnight.
Apple Silicon and T2 Support
Works on M1, M2, M3, M4, and M5 Macs as a universal binary, plus Intel Macs with the T2 security chip. One app covers every Mac Apple currently sells.
Boot Camp Windows Support
Running Windows on an Intel Mac through Boot Camp? Macs Fan Control works there too, with a system tray icon and the same temperature and fan controls you get on macOS.
Ready to take control? Download Macs Fan Control and see the difference.
System Requirements
Macs Fan Control runs on both macOS and Windows via Boot Camp. Here is what your system needs.
macOS Requirements
| Component | Minimum | Recommended |
|---|---|---|
| Operating System | macOS 10.13 High Sierra | macOS 14 Sonoma or newer |
| Processor | Intel Core 2 Duo | Apple M1 or newer / Intel Core i5 |
| RAM | 2 GB | 4 GB or more |
| Disk Space | 25 MB (app only) | 50 MB (with logs and preferences) |
| Display | 1024 x 768 | 1440 x 900 or higher (Retina supported) |
| Permissions | Accessibility access required | Full Disk Access for S.M.A.R.T. data |
Windows (Boot Camp) Requirements
| Component | Minimum | Recommended |
|---|---|---|
| Operating System | Windows 7 (64-bit) | Windows 10 or 11 |
| Processor | Intel Mac with Boot Camp | Intel Core i5 Mac or newer |
| RAM | 2 GB | 4 GB or more |
| Disk Space | 15 MB (installer) | 30 MB (with Boot Camp drivers) |
| Display | 1024 x 768 | 1920 x 1080 |
| Additional | Boot Camp drivers installed | Latest Apple Boot Camp drivers |
Not sure if your Mac is compatible? Download Macs Fan Control and check — the app runs a quick hardware scan on first launch.
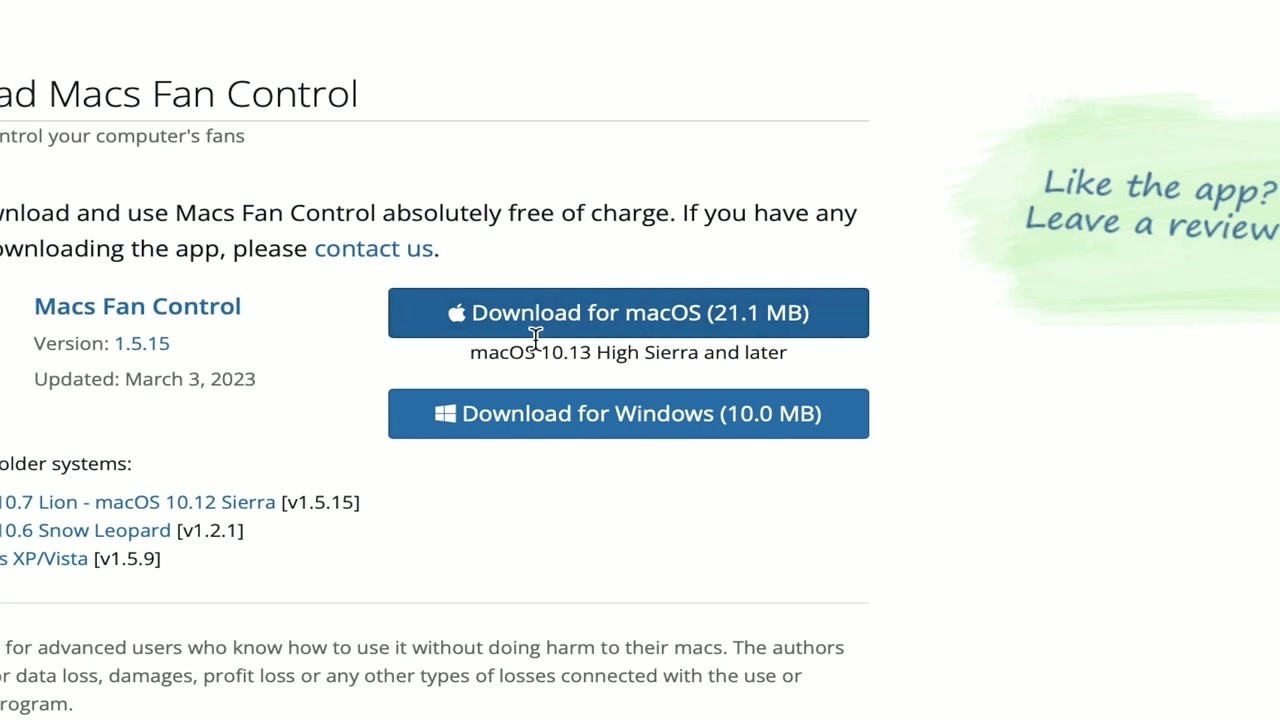
Download Macs Fan Control
Get the latest version of Macs Fan Control for your Mac or Boot Camp Windows installation. The macOS version is free to use with optional Pro upgrade.
Windows (Boot Camp)
Download for WindowsBoot Camp on Intel Macs onlyBefore You Install
The macOS version ships as a ZIP archive containing the app bundle. Unzip it, drag Macs Fan Control into your Applications folder, and launch. On first run, macOS may ask you to grant accessibility permissions so the app can read hardware sensors and adjust fan speeds.
For Windows, run the EXE installer and follow the prompts. Note that the Windows version only works on Intel-based Macs running Boot Camp. Apple Silicon Macs do not support Boot Camp, so Windows users on M-series hardware should use the macOS version instead.
The free tier covers real-time monitoring and manual RPM control. If you want saved presets, automatic fan curves, and other advanced options, the Pro license is available from CrystalIDEA. Unlike TG Pro, which requires a paid license from the start, Macs Fan Control gives you full core functionality at no cost.
Released December 16, 2025 · Developed by CrystalIDEA
Screenshots
See the Macs Fan Control interface in action across macOS and Windows.
Click any screenshot to view full size
Getting Started with Macs Fan Control
A hands-on walkthrough covering download, installation, first launch, and daily use so you can take charge of your Mac’s thermals in under five minutes.
Downloading Macs Fan Control
Head to our download section above and grab the latest version of Macs Fan Control. The app ships in two flavors: a macOS build (22.7 MB .zip archive) and a Windows build (11.7 MB .exe installer for Boot Camp setups). Pick the one that matches the operating system you are running right now.
The macOS download comes as a standard .zip file. Once Safari or your browser finishes the download, it will either unzip automatically or appear in your Downloads folder ready to be extracted. The Windows .exe is a traditional installer that walks you through setup screens.
If you prefer the command line, Homebrew users on macOS can skip the manual download entirely:
brew install --cask macs-fan-control
Version 1.5.20 supports macOS 10.13 High Sierra all the way through the latest macOS releases, including Apple Silicon M1 through M5 chips. On the Windows side, it covers Windows 7 through Windows 11, but only when running under Boot Camp on an Intel Mac.
Installation Walkthrough
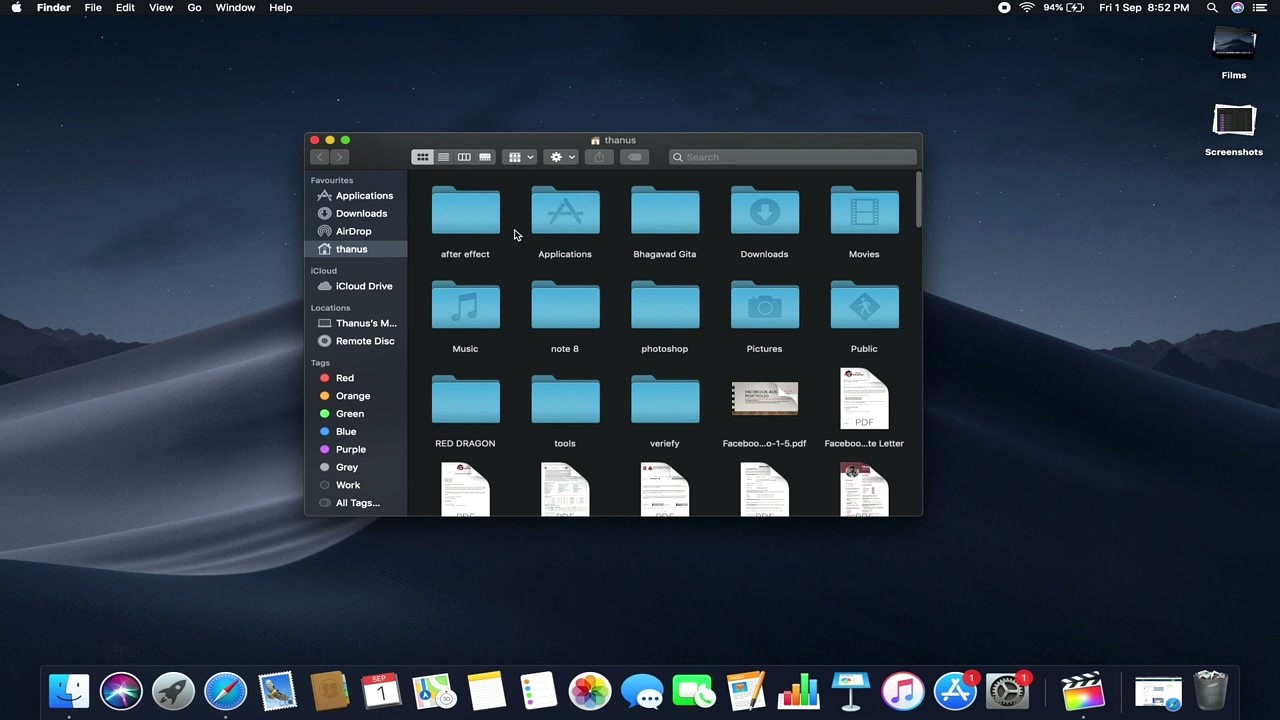
macOS installation is the classic drag-and-drop process. After unzipping the download, you will see the Macs Fan Control app icon. Open a Finder window, navigate to your Applications folder in the sidebar, and drag the app into it.
Double-click the app to launch it. macOS will likely show a Gatekeeper prompt saying the app was downloaded from the internet. Click Open to proceed. On first launch, the app installs a privileged helper tool that lets it read and write to the System Management Controller (SMC). You will be asked for your administrator password to authorize this. Type it in and click OK.
After that one-time authorization, Macs Fan Control opens its main dashboard and begins reading your fan speeds and temperature sensors right away. No registration, no sign-up, no serial key required for the free version.
Windows (Boot Camp) installation follows a more familiar pattern. Run the downloaded .exe file and follow the installer wizard. Accept the license agreement, choose your install directory (the default C:Program FilesMacs Fan Control works fine), and click Install. The installer is clean with no bundled toolbars or third-party offers.
After installation on Windows, the app sits in your system tray (bottom-right corner near the clock). It runs at startup by default so fan settings persist across reboots. The Windows version offers a 14-day free trial; after that, a license is required to continue using it under Boot Camp.
Initial Setup and Configuration
When Macs Fan Control opens for the first time, it launches in Automatic mode. This means all fans are running at whatever speed macOS (or Windows) would normally set. Before changing anything, spend a minute watching the dashboard to get familiar with your Mac’s baseline temperatures and fan speeds.
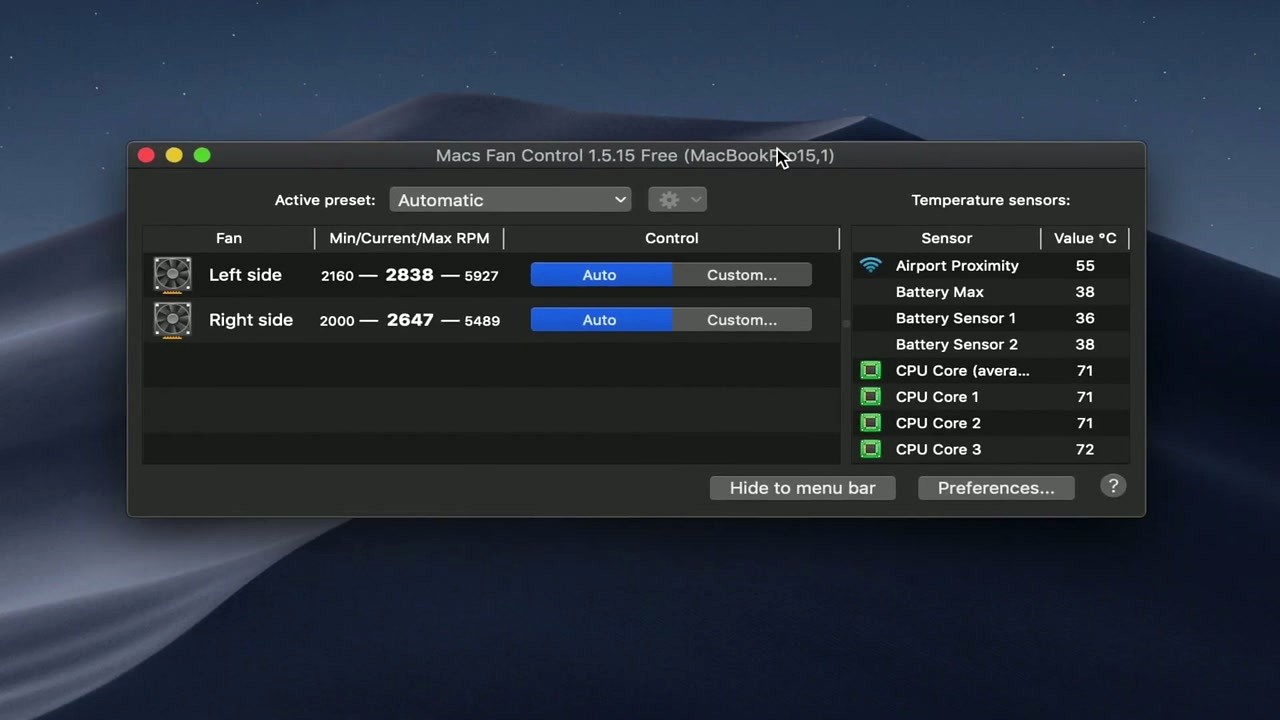
The main window is split into two panels. On the left you see your fans listed with their Min, Current, and Max RPM values. Each fan shows an Auto button (system-controlled) and a Custom button. The right panel displays all available temperature sensors: CPU cores, GPU, battery, SSD, airport card, and more.
Click Preferences (gear icon near the top) to adjust a few useful settings:
- Start at Login — Enable this so Macs Fan Control loads every time you start your Mac. Your custom fan settings will apply immediately on boot.
- Menu Bar Display — Choose what shows in the macOS menu bar: fan speeds, temperatures, or both. Most users pick one CPU sensor and one fan speed for a quick glance.
- Temperature Units — Switch between Celsius and Fahrenheit based on your preference.
- Notifications — Set alerts for when a sensor crosses a specific temperature threshold.
Your First Custom Fan Curve
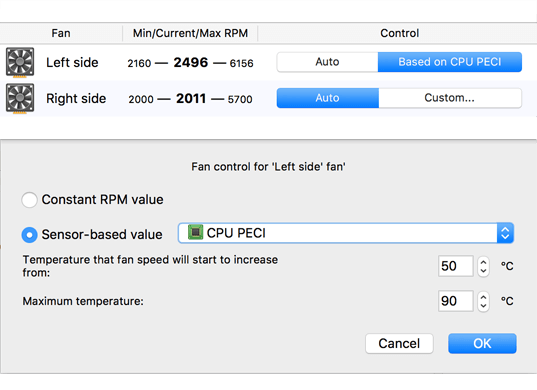
This is where Macs Fan Control really earns its keep. Click the Custom… button next to any fan in the left panel. A dialog box opens with two radio buttons: Constant RPM value and Sensor-based value.
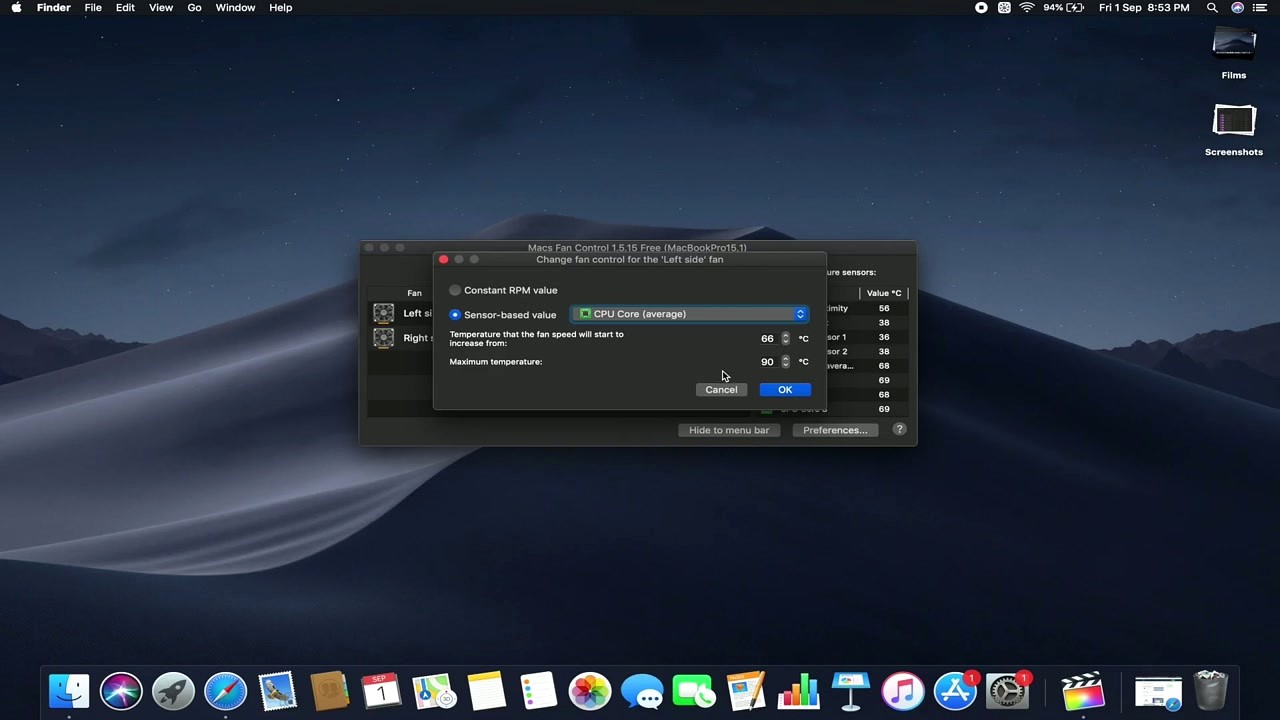
Constant RPM locks a fan at a fixed speed. Drag the slider to set it. This is handy when you want a quiet Mac during a meeting or a video call. Set both fans to around 2000 RPM for near-silent operation. Just keep an eye on temperatures while doing it.
Sensor-based value is the smarter option for daily use. Select it, then pick a sensor from the dropdown (CPU Core average is the most common choice). You will see two fields:
- Temperature that the fan speed will start to increase from — this is your lower threshold. A good starting point is 50-60°C.
- Maximum temperature — when the sensor hits this value, the fan runs at full speed. Set this to 85-90°C for safe headroom.
Between those two temperatures, the fan speed scales linearly. Below the lower threshold the fan idles at its minimum RPM. Click OK to apply.
For a practical example: on a 15-inch MacBook Pro, set the Left side fan to sensor-based control using “CPU Core (average)” with a start temperature of 55°C and a max of 85°C. Do the same for the Right side fan. This keeps the machine quiet during web browsing and email, but ramps up cooling during video rendering or compiling code.
The Active preset dropdown at the top of the window shows “Automatic” by default. Once you customize any fan, it switches to “Custom.” Pro users can save multiple presets (Quiet, Performance, or custom names) and switch between them with a click. Presets are a Pro feature available for a one-time purchase.
Tips, Tricks, and Best Practices
Keep CPU temps below 95°C. Modern Intel and Apple Silicon chips will thermal-throttle above that threshold, slowing down performance to protect themselves. If you see temperatures regularly hitting 90°C+, lower your fan curve thresholds or set a slightly higher minimum RPM.
iMac HDD replacement fix. Replaced your iMac’s hard drive with an SSD? macOS often spins the fans at full blast because it loses the HDD’s built-in temperature sensor. Macs Fan Control solves this: set the fan to sensor-based control using the SSD’s S.M.A.R.T. temperature reading instead.
Menu bar at a glance. Click the Macs Fan Control icon in the menu bar for a quick temperature overview without opening the full window. Right-click it for fast access to presets and preferences.
Common mistakes to avoid: setting fans to their absolute minimum RPM and walking away during a heavy workload, or choosing a sensor that does not match the component you are trying to cool (for example, using a battery sensor to control the CPU fan). Always match the fan to its closest related sensor.
Where to find help: the official FAQ at crystalidea.com/macs-fan-control/faq covers most questions. For community support, Reddit threads on r/mac and r/macbookpro frequently discuss Macs Fan Control settings. The GitHub issues page at github.com/crystalidea/macs-fan-control is the place to report bugs or request features. Unlike smcFanControl, Macs Fan Control receives regular updates with support for the latest hardware, including T2 chip and Apple Silicon Macs.
Stay current. The app checks for updates automatically. You can also visit the download section on this page for the latest version, or follow CrystalIDEA’s release notes on GitHub.
Ready to cool things down? Download Macs Fan Control and set up your first fan curve today.
Frequently Asked Questions
Answers to the most common questions about Macs Fan Control, from installation and safety to fan curve configuration and Apple Silicon compatibility.
Is Macs Fan Control safe to download and install?
Yes, Macs Fan Control is safe. The app has been in active development since 2012 by CrystalIDEA, a software company that also makes AnyToDMG and Uninstall Tool. FileHorse regularly scans the installer with 67+ antivirus engines through VirusTotal, and the results come back clean every time.
The application is distributed through the official CrystalIDEA website and GitHub releases. It has collected over 3,600 reviews on MacUpdate and has been recommended by XDA Developers, CNET, TechSpot, and MacWorld. The macOS version is a 22.7 MB ZIP file, and the Windows Boot Camp installer is 11.7 MB.
- Always download from crystalidea.com/macs-fan-control/download or the GitHub releases page
- Avoid third-party download sites that may bundle adware
- Verify the download by uploading it to VirusTotal.com if you want extra assurance
- The app requests your admin password on first launch to install a helper tool for SMC access — this is normal behavior for any fan control software
Pro tip: If your antivirus flags the file, it is a false positive. Fan control apps access low-level hardware (the SMC chip), which triggers heuristic-based detections. One Reddit user reported a single engine (AVL) flagging the Boot Camp version as “Trojan/Generic.ASMalwS.25C” while 66 other engines showed it clean.
For more details on what the app does, see our overview section.
Can Macs Fan Control damage my Mac?
No, the software itself cannot damage your Mac. However, setting fan speeds too low during heavy workloads (video rendering, gaming, compiling) can lead to higher temperatures. The official download page warns that the program “is for advanced users who know how to use it without doing harm to their macs.”
macOS has built-in thermal protection. If the CPU exceeds approximately 100°C, the system will throttle clock speeds or shut down to prevent hardware damage. You will see kernel_task consuming high CPU before that point, which is macOS generating intentional idle cycles to reduce heat output. This happens whether or not Macs Fan Control is installed.
- Use sensor-based automatic fan curves instead of very low constant RPM values
- Set the CPU PECI sensor as your control source with a start temperature of 50-54°C
- Let fans ramp to maximum by 85-90°C
- If you quit the app, fans automatically revert to macOS default control
Pro tip: Observe your Mac’s temperatures in Auto mode for a few days before creating custom profiles. This gives you a baseline to work from and helps you avoid accidentally setting fans too low for your typical workload.
See our Getting Started guide for recommended fan curve settings.
Why is Macs Fan Control not available on the Mac App Store?
Apple does not allow apps that directly access the System Management Controller (SMC) chip on the App Store. Fan control requires low-level hardware communication that violates the App Store sandboxing requirements Apple enforces on all listed apps.
This restriction applies to every fan control application, not just Macs Fan Control. TG Pro, smcFanControl, and iStat Menus fan control all distribute outside the App Store for the same reason. The SMC chip manages fans, LEDs, thermal sensors, and power management. Apple considers direct access to it a security boundary that App Store apps must not cross.
Download Macs Fan Control directly from crystalidea.com or from the GitHub releases page at github.com/crystalidea/macs-fan-control/releases. Both are maintained by the developer. On first launch, macOS Gatekeeper may show a warning since the app is not from the App Store. Right-click the app and select “Open” to bypass the Gatekeeper prompt once.
Pro tip: After installing, you can verify the code signature by running codesign -vvv /Applications/Macs Fan Control.app in Terminal. A valid signature confirms the binary has not been tampered with.
See the download section for direct links to the official installer.
Does Macs Fan Control work on Apple Silicon (M1, M2, M3, M4)?
Yes. Version 1.5.9 (April 2021) added native Apple Silicon support, and the app now works on M1, M2, M3, M4, and their Pro, Max, and Ultra variants. Temperature monitoring is reliable across all Apple Silicon models. Fan control works on most configurations with one notable exception.
M3 and M4 Pro/Max MacBook Pros have firmware-level restrictions where macOS disables fans at low temperatures. When the CPU is below approximately 77-80°C, the hardware itself turns fans off, and Macs Fan Control cannot override this. Once the system heats up enough for macOS to activate the fans, manual control resumes. Version 1.5.18 (June 2025) restored complete fan control on M3/M4 MacBook Pro models and added Mac Studio M4 Max and MacBook Air M4 support.
- M1/M2 (all variants): Full monitoring and fan control
- M3/M4 base models: Full monitoring and fan control
- M3/M4 Pro/Max MacBook Pro: Monitoring always works; fan control available only when macOS activates fans (above ~77°C)
- MacBook Air (M1/M2/M3/M4): Temperature monitoring only (no internal fan to control)
Pro tip: On Apple Silicon, use sensor-based control rather than constant RPM. Set CPU PECI with a start temperature of 54°C and max at 85°C. This lets macOS handle idle cooling while your custom curve takes over during workloads.
Check system requirements for the full list of supported Mac models.
Which macOS versions does Macs Fan Control support?
The current version (v1.5.20) supports macOS 10.13 High Sierra through macOS 15 Sequoia. It ships as a universal binary that runs natively on both Intel and Apple Silicon processors.
CrystalIDEA also maintains legacy downloads for older systems. Version 1.5.20 also covers macOS 10.7 Lion through macOS 10.12 Sierra for older Intel Macs, and version 1.2.1 supports macOS 10.6 Snow Leopard. These older builds are available on the GitHub releases page if you need them for a vintage Mac.
One thing to be aware of: macOS Sonoma 14.7 and macOS Sequoia introduced stricter firmware controls over fan management. Some users reported that manual fan speed adjustment stopped working on certain models after updating. CrystalIDEA addressed this in version 1.5.18 (June 2025), which restored fan control on the affected hardware. If you just updated macOS and fan control stopped responding, update Macs Fan Control to the latest version first.
Pro tip: After a major macOS update (e.g., Ventura to Sonoma, or Sonoma to Sequoia), the SMC helper tool may need to be reinstalled. The app will prompt you for your admin password when this is needed.
See download options for links to both current and legacy versions.
Does Macs Fan Control work on Windows via Boot Camp?
Yes, but only on Intel Macs running Windows through Apple Boot Camp. The Windows version is a separate 11.7 MB installer that gives you fan monitoring and control from the Windows system tray. Apple Silicon Macs do not support Boot Camp, so this is Intel-only.
Boot Camp users particularly need fan control software because Windows has no native access to the Mac SMC chip. Without an app like Macs Fan Control, Boot Camp relies on basic EFI-level fan management that often keeps fans at minimum speed regardless of CPU temperature. This is why MacBooks running Windows frequently overheat during gaming or heavy workloads.
The Windows version has a 14-day free trial. After that, a Pro license is required. The macOS + Windows bundle costs approximately $24.95 (one-time purchase, no subscription). A Reddit user who games in Boot Camp recommended setting up an aggressive fan curve: start ramping fans at 50°C and reach maximum by 80°C, since gaming temperatures of 85-95°C are common without proper fan management.
Pro tip: If you see temperatures consistently above 90°C during Boot Camp gaming, your Mac likely needs a thermal paste replacement. Macs Fan Control helps manage symptoms, but dried thermal compound on an older MacBook Pro is the root cause of extreme heat under Windows.
Check features for more on what the Windows version offers.
Is Macs Fan Control free to use?
The macOS version is free with full core functionality. You get fan speed monitoring, temperature sensor readouts for CPU, GPU, SSD, and memory, manual RPM control, and sensor-based automatic fan curves at no cost. There is no time limit on the free macOS version.
The Pro license ($14.95, one-time) adds unlimited custom fan presets. The free version gives you three fixed presets: Automatic, Full Blast, and one Custom profile. Pro lets you create named presets like “Quiet Office,” “Video Editing,” or “Gaming” and switch between them with a click. Pro also includes priority customer support and guaranteed access to future updates.
The Windows Boot Camp version works differently. It has a 14-day free trial with full functionality, after which a Pro license is required to continue using it. The macOS + Windows bundle costs approximately $24.95. All licenses are one-time purchases with no subscription fees.
Pro tip: Most users never need Pro. The free Custom preset saves your fan settings when the app quits and reapplies them on next launch (assuming autostart is enabled). Pro is worth it if you switch between multiple fan profiles regularly, such as quiet work during calls versus aggressive cooling during renders.
Ready to try it? Head to the download section.
What does the Pro version add over the free version?
Pro unlocks unlimited custom fan presets. In the free version, you get three fixed profiles: Automatic (macOS default), Full Blast (all fans at max RPM), and one Custom profile where you configure individual fan settings. With Pro, you can create as many named presets as you need and switch between them instantly.
This matters if your workload varies throughout the day. A content creator might want a “Quiet” preset for microphone recording (fans at minimum), a “Balanced” preset for web browsing and email, and a “Rendering” preset that ramps fans aggressively for video exports. Without Pro, you would need to manually reconfigure the single Custom profile each time.
Pro also includes priority customer support and guaranteed updates. The license is per-computer and costs $14.95 for macOS or $24.95 for the macOS + Windows Boot Camp bundle. No subscription, no recurring fees. Volume discounts apply if you buy multiple licenses for several Macs.
Pro tip: Before buying, use the free version for a week. If you only need one fan configuration (most people do), the free Custom preset handles it fine. Pro pays for itself if you regularly switch between two or more distinct cooling profiles.
Visit features for a breakdown of what the app can do.
How do I install Macs Fan Control on macOS?
Installation takes about 30 seconds. Download the ZIP file from the official site, unzip it, and drag the app to your Applications folder. The entire process does not require a package installer or terminal commands.
- Download the ZIP from the download section or crystalidea.com/macs-fan-control/download
- Double-click the downloaded ZIP to extract it
- Drag “Macs Fan Control” to your Applications folder
- Launch the app from Applications. macOS Gatekeeper may show a warning since it is not from the App Store — right-click and select “Open” to bypass this once
- Enter your macOS admin password when prompted. This installs the privileged helper tool that communicates with the SMC chip
- The app appears in your menu bar. Click the icon to see fan speeds and temperatures
To set up automatic launch, open Preferences from the menu bar icon and enable “Start at login.” Your custom fan profile will then apply every time you log in without needing to open the app manually.
Pro tip: If the app asks for your password again after an update, that means the helper tool was updated too. This is expected behavior and happens a few times a year at most.
For complete setup instructions, see our Getting Started guide.
How do I completely uninstall Macs Fan Control?
Uninstalling requires two steps because the app installs a privileged helper tool that runs separately from the main application. Dragging the app to the Trash alone leaves the helper behind.
- Open Macs Fan Control and click the menu bar icon
- Go to More > Uninstall to remove the SMC helper tool
- Quit the app
- Drag “Macs Fan Control” from your Applications folder to the Trash
- Empty the Trash
After uninstalling, your fans immediately return to macOS default automatic control. You do not need to restart your Mac. If you installed the app on a Windows Boot Camp partition, uninstall it through the Windows Programs and Features panel instead.
If the app was crashing and you cannot access the More menu, you can remove the helper manually. Open Terminal and run: sudo launchctl unload /Library/LaunchDaemons/com.crystalidea.macsfancontrol.helper.plist followed by deleting that plist file. Then trash the app from Applications.
Pro tip: Before uninstalling, set all fans back to “Auto” mode. While the app does this automatically on quit, doing it manually first gives you visual confirmation that macOS has resumed control.
Need to reinstall? Get the latest version from our download section.
My fans show 0 RPM in Macs Fan Control. Is something broken?
Probably not. On MacBooks from 2015 onward and all Apple Silicon Macs, fans genuinely spin at 0 RPM during light workloads. Apple Silicon chips are efficient enough that browsing, email, and light coding produce almost no heat. Mac mini M4 users on Reddit regularly report 0 RPM readings during normal desktop use.
Where 0 RPM becomes a concern is during heavy workloads with high temperatures. If your CPU shows 85°C+ and fans still read 0 RPM, something is wrong. On M3/M4 Pro/Max MacBook Pros, this can happen due to firmware restrictions where macOS controls fan activation below ~77°C. On Intel Macs, 0 RPM during load usually indicates a hardware problem.
To diagnose:
- Restart your Mac and hold the D key to run Apple Diagnostics
- Check for fan cable connections if you recently opened the Mac for repairs
- Try Full Blast mode in Macs Fan Control. If fans respond, the hardware is working and 0 RPM at idle is normal behavior
- Reset the SMC on Intel Macs: shut down, hold Power + Shift + Control + Option (left side) for 10 seconds, then release and power on
Pro tip: Apple Silicon Macs do not have a traditional SMC. If you suspect a fan problem on an M-series Mac, shut down completely, wait 30 seconds, and restart. This performs the equivalent of an SMC reset.
See features for details on monitoring capabilities.
Macs Fan Control says fans are controlled by another application. How do I fix this?
This error means another app is already sending commands to the SMC chip. Only one application can control fan speeds at a time. The most common culprits are smcFanControl, TG Pro, iStat Menus (with fan control enabled), and SSD Fan Control.
To resolve the conflict:
- Check your menu bar for other fan/temperature apps and quit them
- Open Activity Monitor and search for processes like “smcFanControl,” “TG Pro,” or “FanControl”
- Check System Settings > General > Login Items for fan control apps that launch at startup
- Look in
/Library/LaunchDaemons/and~/Library/LaunchAgents/for leftover plist files from previously uninstalled fan control apps - Restart your Mac after removing the conflicting software
If the error persists after removing all other fan control software, reset the SMC. On Intel Macs: shut down, hold Power + Shift + Control + Option for 10 seconds, release, power on. On Apple Silicon: shut down, wait 30 seconds, power on. This clears any stuck SMC state that a previous app may have left behind.
Pro tip: If you previously used smcFanControl and switched to Macs Fan Control, check for a leftover LaunchAgent at ~/Library/LaunchAgents/com.eidac.smcFanControl.plist. Delete it and restart.
For alternative software comparisons, see our features section.
kernel_task is using high CPU after changing fan settings. What happened?
Your custom fan profile is not cooling the Mac fast enough. macOS uses kernel_task as a thermal protection mechanism. When the CPU overheats, kernel_task consumes CPU cycles intentionally to generate idle time, which reduces heat output. This is normal macOS behavior, not a bug in Macs Fan Control.
The fix is straightforward: your fans need to spin faster at lower temperatures. If you set fans to a low constant RPM (say 1200 RPM) and then run a demanding task, the Mac heats up, macOS panics, and kernel_task spikes to 200-400% CPU. This creates a feedback loop where thermal throttling makes everything slower.
- Immediately switch fans to “Auto” or “Full Blast” to bring temperatures down
- Wait for kernel_task CPU usage to drop (usually takes 30-60 seconds as the Mac cools)
- Create a new sensor-based profile with more aggressive settings: CPU PECI starting at 50°C, maximum fan speed by 80°C
- If kernel_task stays elevated even with fans at maximum, check for dust buildup inside the Mac or dried thermal paste
Pro tip: Dust buildup is the number one cause of overheating on Macs older than 2-3 years. Open the bottom panel (MacBook) or rear vent area (iMac) and use compressed air to clean the fans and heatsink. If the Mac is more than 5 years old, replacing the thermal paste on the CPU/GPU can drop temperatures by 10-20°C.
Learn more about setting up proper fan curves in our Getting Started guide.
Fan control stopped working after updating macOS. How do I fix it?
macOS Sonoma 14.7 and macOS Sequoia introduced stricter firmware-level fan management that broke manual control for several Mac models. This affected both Macs Fan Control and iStat Menus. The issue was widely reported on MacRumors forums and Reddit.
CrystalIDEA addressed the problem in version 1.5.18 (June 2025), which restored fan control on affected M3/M4 models. The fix required changes to how the app communicates with the updated SMC firmware. If you are running an older version of Macs Fan Control, updating the app is the first thing to try.
- Update Macs Fan Control to version 1.5.20 (latest) from crystalidea.com or GitHub
- Open the new version. It will ask for your admin password to update the helper tool
- If fan control still does not work, go to More > Uninstall, then reinstall from scratch
- On Intel Macs, reset the SMC after reinstalling
- On Apple Silicon, shut down completely, wait 30 seconds, and restart
On M3/M4 Pro/Max MacBook Pros, there is a permanent firmware limitation where macOS disables fans below approximately 77°C. This is not a bug in Macs Fan Control; Apple’s firmware simply does not allow fan activation until the CPU reaches that threshold. Temperature monitoring continues to work regardless.
Pro tip: Before updating macOS, check the Macs Fan Control GitHub issues page (github.com/crystalidea/macs-fan-control/issues) to see if other users have reported problems with the new macOS version. CrystalIDEA typically releases a compatible update within 1-2 weeks of a major macOS release.
Download the latest version from our download section.
How do I update Macs Fan Control to the latest version?
The app checks for updates automatically each time it launches and displays a notification when a new version is available. You can also check manually by visiting the official download page or the GitHub releases page at github.com/crystalidea/macs-fan-control/releases.
To update manually:
- Download the new version ZIP from crystalidea.com/macs-fan-control/download or our download section
- Unzip the file
- Drag the new “Macs Fan Control” to Applications, replacing the old version
- Launch the updated app. If the helper tool changed, you will be asked for your admin password
Your custom fan profiles carry over between versions. You do not need to reconfigure anything after updating. The current latest version is 1.5.20, released December 16, 2025, which supports macOS 10.13 through macOS 15 Sequoia and all Apple Silicon models including the Mac Studio M4 Max.
Pro tip: If you want to disable the automatic update check on launch, look in the app preferences for an update-check toggle. Some users on metered connections prefer to update manually.
See system requirements for compatibility details.
Macs Fan Control vs smcFanControl: which is better?
Macs Fan Control is the better choice for most users in 2025-2026. smcFanControl is free and open-source, but it only supports Intel Macs and has not received significant updates for Apple Silicon. If you have an M1, M2, M3, or M4 Mac, smcFanControl will not work.
The feature gap is significant. smcFanControl only lets you set a minimum fan speed above Apple’s default. You cannot create sensor-based curves, set an exact RPM, or monitor temperature sensors within the app. Macs Fan Control offers all of these plus S.M.A.R.T. drive monitoring and menu bar temperature display.
| Feature | Macs Fan Control | smcFanControl |
| Apple Silicon | Yes | No |
| Sensor-based curves | Yes | No |
| Temp monitoring | Built-in | No |
| Windows Boot Camp | Yes (paid) | No |
| Price (macOS) | Free | Free |
Pro tip: If you previously used smcFanControl on an Intel Mac and are migrating to Apple Silicon, Macs Fan Control is the natural replacement. Your minimum-speed approach from smcFanControl translates to a constant RPM profile in Macs Fan Control, though sensor-based curves are more effective.
See our features section for the full Macs Fan Control capability list.
Macs Fan Control vs TG Pro: which should I choose?
TG Pro ($10-20 one-time) is the more advanced tool. It exposes more temperature sensors (WiFi module, battery cells, logic board zones), supports built-in stress tests, and uses fan curves that complement macOS defaults rather than override them completely. TG Pro was also the first app to support M4 fan control (version 2.97).
Macs Fan Control is better for users who want straightforward, free fan control without extra complexity. The interface is simpler: two panels showing fans on the left and sensors on the right. For most people, this is enough. TG Pro makes more sense if you need detailed thermal analysis, hardware stress testing, or if you work in environments where thermal management is critical (server rooms, video production suites, music studios with acoustic constraints).
Both apps are well-maintained and regularly updated. The main practical difference: Macs Fan Control is free for core functionality on macOS, while TG Pro requires purchase from the start. If you also use Windows Boot Camp, Macs Fan Control is the only option with Windows support.
Pro tip: Some power users run both. TG Pro for detailed monitoring and diagnostics, Macs Fan Control for the actual fan speed profiles. They can coexist as long as only one is actively controlling fans (use the other for monitoring only).
Check our system requirements for supported hardware.
What is the best temperature sensor for automatic fan control?
CPU PECI (Platform Environment Control Interface) is the best sensor for most users. It gives the most accurate overall CPU temperature reading because it aggregates data from multiple internal thermal diodes. Reddit users and the CrystalIDEA support page both recommend it as the default choice.
Recommended settings for a CPU PECI-based fan curve:
- Fan starts increasing: 50-54°C (below this, fans stay at minimum or off on Apple Silicon)
- Fan reaches maximum: 85-90°C (this gives the cooling system room to work before throttling kicks in at ~100°C)
- Curve shape: Linear works well for general use. Aggressive (exponential) ramp is better for gaming or rendering
For GPU-heavy work (3D rendering, video editing, gaming in Boot Camp), pair CPU PECI with the GPU temperature sensor. Some users set the left fan to CPU PECI and the right fan to GPU temperature on MacBook Pros, which distributes cooling more effectively across both heat-generating components.
Pro tip: Avoid using the “CPU Core” or “CPU Die” sensors for fan control. These readings spike rapidly and cause fans to oscillate between low and high speed. CPU PECI smooths out these spikes because it measures the overall package temperature rather than individual core hot spots.
For a full walkthrough on setting up fan curves, see our Getting Started guide.
How do I use Macs Fan Control after replacing an iMac hard drive with an SSD?
This is one of the most popular reasons people install Macs Fan Control. When you replace the original HDD in a 2009-2019 iMac with a third-party SSD, the HDD temperature sensor cable either disconnects or reports incorrect readings. macOS responds by running the HDD fan at full speed (approximately 5500 RPM) as a safety measure, which is extremely loud.
Macs Fan Control solves this by letting you link the HDD fan to the SSD’s S.M.A.R.T. temperature sensor instead of the disconnected Apple sensor. The setup process:
- Open Macs Fan Control and find the HDD fan (usually labeled “Hard Disk” or “ODD” in the fan list)
- Click the fan and select “Sensor-based value”
- Choose your SSD’s S.M.A.R.T. temperature sensor from the dropdown (it will be listed by drive name)
- Set the temperature curve: start increasing at 35°C, maximum at 55°C (SSDs run cooler than HDDs)
- Enable “Start at login” in preferences so the profile applies automatically on boot
You can also set the HDD fan to a constant RPM (1200-1800 RPM is quiet but sufficient for airflow) if your SSD does not report S.M.A.R.T. temperatures through the SATA connection.
Pro tip: If you used an OWC temperature sensor cable during the SSD upgrade, you may not need Macs Fan Control for the HDD fan. But the app is still useful for monitoring overall system temperatures and controlling the CPU and GPU fans.
See our Getting Started guide for more configuration examples.
Can I control left and right fans independently on a MacBook Pro?
Yes. On MacBook Pros and other Macs with multiple fans, each fan appears as a separate entry in the Macs Fan Control interface. You can assign different control profiles to each one. The left fan, right fan, and exhaust fan (on models that have three) all show up individually with their own minimum, current, and maximum RPM readings.
A common setup for MacBook Pro users who do both CPU and GPU-intensive work:
- Left fan: Sensor-based using CPU PECI, ramp from 50°C to 85°C
- Right fan: Sensor-based using GPU temperature, ramp from 50°C to 85°C
This approach distributes cooling based on which component is generating more heat. During a CPU-bound compilation, the left fan works harder. During GPU rendering, the right fan picks up the load. With both fans linked to the same sensor, one side may be over-cooling while the other is under-cooling.
Pro tip: On the 16-inch MacBook Pro, the left fan is closer to the CPU and the right fan is closer to the GPU on most configurations. Assigning each fan to the nearest heat source gives you the most efficient cooling layout.
Check features for the full list of monitoring and control capabilities.
Still have questions? Download Macs Fan Control and try it yourself.
Download Macs Fan Control